이전 포스팅에서,
BULMA CSS를 프로젝트에서 사용하기 위한 준비를 하였습니다.
static 폴더안에 Bulma 폴더가 생성되고, 그안에 CSS 폴더안에, style.css 파일이 생성되었습니다.
이제 이 CSS 를 적용한 기본 템플릿을 생성하고,
이 기본 템플릿을 다른 페이지들이 상속받아 사용하게 해봅니다.
Templates 폴더 생성
프로젝트 폴더안에, templates 폴더를 생성합니다.
그리고, 그 폴더안에, base.html 파일을 생성합니다. 아래 트리 구조 형태로 생성합니다.
1
2
3
4
5
6
7
8
9
10
11
12
13
14
15
16
17
18
19
20
21
22
23
24
25
26
27
28
29
30
31
32
33
34
35
36
37
| .
├── config
│ ├── asgi.py
│ ├── __init__.py
│ ├── settings.py
│ ├── urls.py
│ └── wsgi.py
├── db.sqlite3
├── manage.py
├── requirements.txt
├── static
│ └── bulma
│ ├── css
│ │ ├── style.css
│ │ ├── style.css.map
│ │ └── style.min.css
│ └── sass
│ ├── package.json
│ ├── package-lock.json
│ └── style.sass
├── templates
│ └── base.html
└── todo
├── admin.py
├── apps.py
├── __init__.py
├── migrations
│ ├── 0001_initial.py
│ ├── 0002_auto_20200511_1242.py
│ ├── __init__.py
├── models.py
├── templates
│ └── todo
│ └── todo-lists.html
├── tests.py
├── urls.py
└── views.py
|
생성된 templates 폴더 설정하기
생성된 templates 폴더를,
프로젝트의 templates 폴더로 사용하기 위해서,
config/settings.py 파일에 templates 폴더를 지정해주어야 합니다.
settings.py 파일안에, TEMPLATES 부분에, DIR 값을 아래와 같이 설정해 줍니다.
1
2
3
4
5
6
7
8
9
10
11
12
13
14
15
16
|
TEMPLATES = [
{
'BACKEND': 'django.template.backends.django.DjangoTemplates',
'DIRS': [os.path.join(BASE_DIR, 'templates')],
'APP_DIRS': True,
'OPTIONS': {
'context_processors': [
'django.template.context_processors.debug',
'django.template.context_processors.request',
'django.contrib.auth.context_processors.auth',
'django.contrib.messages.context_processors.messages',
],
},
},
]
|
base.html 파일 꾸미기
templates/base.html 파일은, 다른 템플릿 페이지들이 상속받아서 사용할 페이지 입니다.
base.html 파일을 아래와 같이 생성해 줍니다. 이 파일은 BULMA CSS 프레임워크가 적용되어 있고,
이 파일을 상속받는 다른 페이지들도, BULMA CSS 적용이 될것입니다.
1
2
3
4
5
6
7
8
9
10
11
12
13
14
15
16
17
18
19
20
21
| {% load static %}
<!DOCTYPE html>
<html lang="en">
<head>
<meta charset="UTF-8">
<meta name="viewport" content="width=device-width, initial-scale=1.0">
{% block title %}
<title>To do List</title>
{% endblock %}
{% block head %} {% endblock %}
</head>
<body>
{% block content %}
{% endblock %}
</body>
</html>
|
위와 같은 구조를 만들었으면,
이제 BULMA CSS 프레임워크를 이용하여, 기본 레이아웃 구조를 만들어 줍니다.
첫번째로, 네비게이션 바를 만들어 놓을겁니다.
이 네비게이션 바를 base.html 파일에 만들어놓고,
다른 페이지들이 이 base.html 파일을 확장하여 사용하면,
base.html 파일에 있는 네비게이션 바가, 기본으로 다른 페이지들에도 보이게 될것입니다.
Bulma CSS Navbar 를 적용하기 위해서, 아래 사이트를 참조합니다.
https://bulma.io/documentation/components/navbar/
이곳에 나와 있는 Basic Navbar 를 조금 수정하여, 사용할것입니다.
위에 작성한, base.html 파일에, 이 Bulma Navbar 를 아래와 같이 수정하여 붙여 놓습니다.
1
2
3
4
5
6
7
8
9
10
11
12
13
14
15
16
17
18
19
20
21
22
23
24
25
26
27
28
29
30
31
32
33
34
35
36
37
38
39
40
41
42
43
44
45
46
47
48
49
50
51
52
53
54
55
56
57
58
59
60
61
62
63
64
65
66
67
68
69
70
71
72
73
74
75
76
77
78
79
80
81
82
83
84
85
| {% load static %}
<!DOCTYPE html>
<html lang="en" class="has-navbar-fixed-top">
<head>
<meta charset="UTF-8">
<meta name="viewport" content="width=device-width, initial-scale=1.0">
<title>To do List - {% block title %}{% endblock %}</title>
<link rel="stylesheet" type="text/css" href="{% static 'bulma/css/style.css' %}">
{% block head %} {% endblock %}
</head>
<body>
<nav class="navbar is-fixed-top" role="navigation" aria-label="main navigation">
<div class="navbar-brand">
<a class="navbar-item" href="#">
<img src="{% static 'images/todo_list.jpg' %}" width="112" height="28">
</a>
<a role="button" class="navbar-burger burger" aria-label="menu" aria-expanded="false" data-target="navbarBasicExample">
<span aria-hidden="true"></span>
<span aria-hidden="true"></span>
<span aria-hidden="true"></span>
</a>
</div>
<div id="navbarBasicExample" class="navbar-menu">
<div class="navbar-end">
<div class="navbar-end">
<a class="navbar-item">
Home
</a>
<a class="navbar-item">
To Do Lists
</a>
<div class="navbar-item has-dropdown is-hoverable">
<a class="navbar-link">
More
</a>
<div class="navbar-dropdown">
<a class="navbar-item">
About
</a>
<a class="navbar-item">
Jobs
</a>
<a class="navbar-item">
Contact
</a>
<hr class="navbar-divider">
<a class="navbar-item">
Report an issue
</a>
</div>
</div>
</div>
<div class="navbar-item">
<div class="buttons">
<a class="button is-primary">
<strong>Sign up</strong>
</a>
<a class="button is-light">
Log in
</a>
</div>
</div>
</div>
</div>
</nav>
<img src="{% static 'images/main.jpg' %}" width="100%">
{% block content %}
{% endblock %}
</body>
</html>
|
todolist_list.html 을 메인페이지로 사용
base.html 파일을 확장하는, templates/todollist_list.html 파일을 만들고,
여기에 Todo list 들이 나오게 할겁니다.
templates/todolist_list.html 파일 생성
todo/views.py 파일 수정
todo/urls.py 파일 수정
templates/todolist_list.html 파일 생성후 작성
1
2
3
4
5
6
7
8
9
10
11
12
13
14
15
16
17
18
19
20
21
22
| {% extends 'base.html' %}
{% block title %}할일 목록{% endblock %}
{% block content %}
<ul>
{% for todo in to_do_list %}
<li>할일 제목 : {{ todo.name }}</li>
<li>생성 날짜 : {{ todo.date_created }}</li>
<li>데드라인 날짜 : {{ todo.date_deadline }}</li>
<li>남은 일수 : {{ todo.remaining_days }}</li>
{% endfor %}
</ul>
{% endblock content %}
|
todo/views.py 파일 수정
1
2
3
4
5
6
7
8
9
10
11
12
13
| from django.shortcuts import render
from .models import TodoList, TodoList_files, TodoList_images
from django.views import generic
class IndexView(generic.ListView):
context_object_name = 'to_do_list'
def get_queryset(self):
return TodoList.objects.all()
|
config/urls.py 파일 수정
1
2
3
4
5
6
7
| from django.contrib import admin
from django.urls import path, include
urlpatterns = [
path('admin/', admin.site.urls),
path('', include('todo.urls')),
]
|
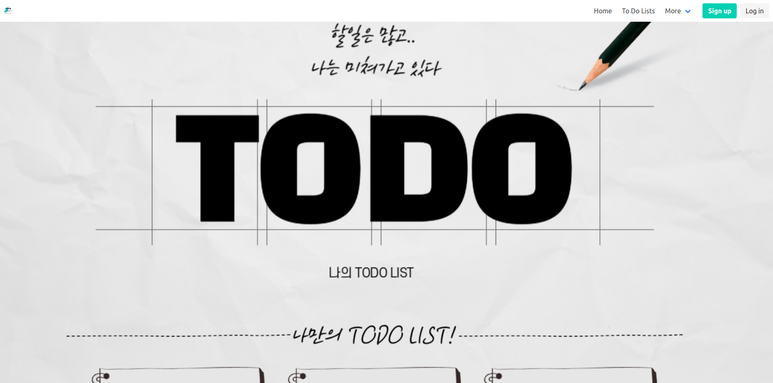
위와 같은 작업을 마치고 나서,
서버를 시작하고
http://127.0.0.1:8000/ 으로 접속하면,
아래와 같은 화면이 나옵니다.
마치며..
아직 익숙치 않아서, 여러가지로 꼬이고 꼬였지만, 레슨이 하나 있었습니다.
View 에서 ListView 클래스를 사용하는데.
예네는 templates 을, templates/todolist_list.html 파일에서 찾습니다;;;
이 파일이 없으면, 렌더가 안되서.
이 파일을 생성하고 메인 url 로 설정해 주었습니다.