당신은 멋쟁이, 우리는 장고쟁이~

0%

TodoList 24편 - AWS S3 적용하기

Amazon S3 적용하기


Amazon S3 란?

Amazon S3 는 인터넷상 어디서나 원하는 양의 데이터를 저장하고 검색할수 있도록 구축된,

객체 스토리지 입니다. 안정성이 매우 뛰어나고, 가용성이 높으며,

무제한으로 확장 가능한 데이터 스토리지 인프라를 매우 저렴한 비용으로 제공하는,

간단한 스토리지 서비스 입니다.


Amazon S3로 무엇을 할수 있나요?


스토리지를 이용하여, 간편한 웹 서비스 인터페이스를 사용할수 있습니다.

인터넷 스토리지를 이용한 어플리케이션을 쉽게 개발할수 있습니다.

원하는 형식의 데이터를 원하는 만큼 저장하고, 동일한 데이터를 수백만번 읽거나 비상 재해 복구 용도로만 사용하고, 간단한 FTP 어플리케이션 또는, Amazon.com 소매 웹사이트와 같은 복잡한 웹 어플리케이션을 구축할수 있습니다.


Amazon S3 를 사용하는 개발자는 데이터 저장 방법에 대한 고민을 하기 보다,

좀더 혁신적인 것들에 집중할수 있습니다.


AWS S3 생성하기


우선, S3 를 생성하기 위해서, AWS S3 Management 콘솔에 접속합니다.


버킷 만들기를 클릭합니다


버킷 이름을 정하고, 버킷 만들기 버튼을 눌러서 버킷을 생성해 줍니다.


필요한 패키지 설치


터미널에서, 아래 명령어를 실행해서, django-storagesboto3 를 설치해 줍니다.


1
2
pip install django-storages
pip install boto3

그리고 나서, settings.py 에 INSTALLED_APPS 에 storage 를 등록해 줍니다.


1
2
3
4
5
6
7
8
9
10
11
12
13
14
15
16
17
18
19
20
21
22
23
24
25
26
27
INSTALLED_APPS = [
'django.contrib.admin',
'django.contrib.auth',
'django.contrib.contenttypes',
'django.contrib.sessions',
'django.contrib.messages',
'django.contrib.staticfiles',

'todo',
'django_extensions',

# storages 설정
'storages',

# Bulma CSS Framework
'bulma',

# Allauth를 위한 Apps
'django.contrib.sites',

'allauth',
'allauth.account',
'allauth.socialaccount',

# ... 소셜로그인을 할 제공자 리스트를 아래에 포함
'allauth.socialaccount.providers.naver'
]


settings.py 에 S3 기본설정


생성된 버킷을 사용하기 위한 패키지들을 모두 설치했으면, S3를 Django 에서 사용하기 위해서,


settings.py 파일에, 아래 내용을 추가해 줍니다.


1
2
3
4
5
6
7
8
9
10
# django-storages 
# Django의 FilesStorage로 S3Boto3Storage (AWS S3)
DEFAULT_FILE_STORAGE = 'storages.backends.s3boto3.S3Boto3Storage'
AWS_ACCESS_KEY_ID = ''
AWS_SECRET_ACCESS_KEY = ''
AWS_STORAGE_BUCKET_NAME = 'todolist-djangojenge'
AWS_S3_CUSTOM_DOMAIN = '%s.s3.amazonaws.com' % AWS_STORAGE_BUCKET_NAME
AWS_AUTO_CREATE_BUCKET = True
AWS_S3_REGION_NAME = 'ap-northeast-2'
AWS_DEFAULT_ACL = None

여기서 중요한 값들은, 아래 두가지 AWS 관련 값들입니다.


  1. AWS_ACCESS_KEY_ID
  2. AWS_SECRET_ACCESS_KEY

이 값들을 받아오기 위한 과정을 아래에 설명합니다.


AWS IAM 에서 ACCESS_KEY 값들 받아오기


AWS_ACCESS_KEY_ID 와 AWS_SECRET_ACCESS_KEY 를 가져오기 위해서는,


AWS IAM 서비스에 접속을 해줍니다.


IAM (Idnetity and Access Management (IAM)) 에서,

사용자 추가를 해줍니다.


사용자 추가 버튼을 누르면, 아래와 같이. 세부정보 설정 페이지가 나오고,


사용자 이름을 쓴 다음, 엑세스 유형을 프로그래밍 방식 엑세스로 선택 합니다.


****

다음 버튼을 누르면, 권한 설정 페이지로 넘어갑니다.


아래와 같이, 기존 정책 직접연결 탭을 누르고 , 정책 필터에 AmazonS3FullAccess 를 검색하여,

정책이름을 클릭합니다. AmazonS3FullAccess 에 표시를 하고, 다음으로 넘어갑니다.


다음은 태그를 설정하는 페이지인데, 그다지 중요하지 않습니다.


그냥 다음으로 넘어갑니다.


검토 사항을 체크하고, 사용자 만들기를 클릭합니다.


사용자 만들기를 클릭하면, 아래 화면 엑세스키 ID 와 비밀엑세스 키 밑에,

각각의 값들이 표시 되어서 나옵니다.


ACCESS_KEY_ID 와 SECRET_ACCESS_KEY 를 여기에서 잘 복사해 둡니다.


이제 이 값들을,

settings.py 파일에 AWS_ACCESS_KEY_ID 값과 AWS_SECRET_ACCESS_KEY 값에 넣어줍니다.


1
2
3
4
5
6
7
8
9
10
# django-storages 
# Django의 FilesStorage로 S3Boto3Storage (AWS S3)
DEFAULT_FILE_STORAGE = 'storages.backends.s3boto3.S3Boto3Storage'
AWS_ACCESS_KEY_ID = '' # ACCESS_KEY_ID 입력
AWS_SECRET_ACCESS_KEY = '' # SECRET_ACCESS_KEY 입력
AWS_STORAGE_BUCKET_NAME = 'todolist-djangojenge'
AWS_S3_CUSTOM_DOMAIN = '%s.s3.amazonaws.com' % AWS_STORAGE_BUCKET_NAME
AWS_AUTO_CREATE_BUCKET = True
AWS_S3_REGION_NAME = 'ap-northeast-2'
AWS_DEFAULT_ACL = None

정적파일 경로 설정


settings.py 파일에 STATIC 관련 내용을 아래와 같이 바꿔줍니다.

1
2
3
4
5
6
7
8
# Static files (CSS, JavaScript, Images)
# https://docs.djangoproject.com/en/3.0/howto/static-files/
PROJECT_DIR = os.path.dirname(os.path.abspath(__file__))
STATIC_ROOT = os.path.join(PROJECT_DIR, 'static')
AWS_LOCATION = 'static'
STATIC_URL = 'https://%s/%s/' % (AWS_S3_CUSTOM_DOMAIN, AWS_LOCATION)
STATICFILES_STORAGE = 'storages.backends.s3boto3.S3Boto3Storage'
STATICFILES_DIRS = [os.path.join(BASE_DIR, 'static')]

위와 같이 STATIC 관련 내용을 설정해주었으면, 아래 명령어를 실행하여, staticfiles 들을 모아줍니다.


1
python manage.py collectstatic

1
2
3
4
5
6
7
8
9
10
11
12
13
14
15
16
$ python manage.py collectstatic 
You have requested to collect static files at the destination
location as specified in your settings.

This will overwrite existing files!
Are you sure you want to do this?

Type 'yes' to continue, or 'no' to cancel: yes
Found another file with the destination path 'bulma/sass/package.json'. It will be ignored since only the first encountered file is collected. If this is not what you want, make sure every static file has a unique path.
Found another file with the destination path 'bulma/sass/package-lock.json'. It will be ignored since only the first encountered file is collected. If this is not what you want, make sure every static file has a unique path.
Found another file with the destination path 'bulma/sass/style.sass'. It will be ignored since only the first encountered file is collected. If this is not what you want, make sure every static file has a unique path.
Found another file with the destination path 'bulma/css/style.css.map'. It will be ignored since only the first encountered file is collected. If this is not what you want, make sure every static file has a unique path.
Found another file with the destination path 'bulma/css/style.min.css'. It will be ignored since only the first encountered file is collected. If this is not what you want, make sure every static file has a unique path.
Found another file with the destination path 'bulma/css/style.css'. It will be ignored since only the first encountered file is collected. If this is not what you want, make sure every static file has a unique path.

144 static files copied.


마치며..


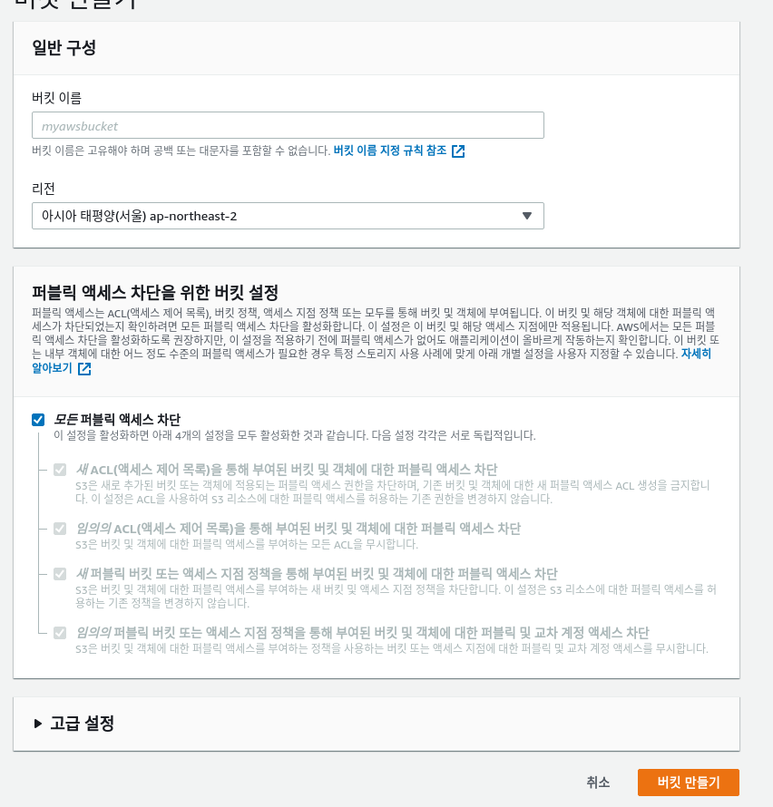
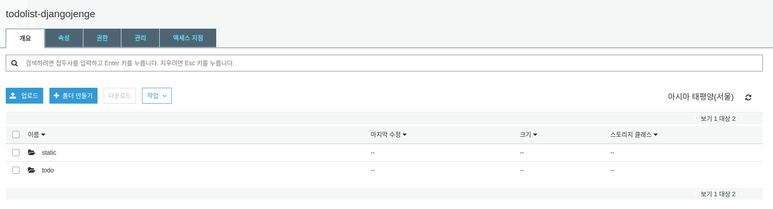
S3에 로그인해서 들어가보면, static 하고 todo 폴더가 생성되어 있는것을 확인 할수 있었습니다.


정적파일과, 미디어 파일을 관리하는 폴더입니다.


그런데, 문제가 하나 생깁니다.. 정적파일을 모으고 서버를 실행시켜도.


정적파일들이 적용되지 않는것을 확인할수 있습니다.